This is a VERY LONG POST about the process I used to design a new knitting/sewing/drawing bag; I will try to title further entries about the process the same way I did this one, so you non-yarny/textiley folks can skip it (or at least be WARNED). ;) --JBB
ETA: Now with 100% more pics!
Last year, I designed what I hoped would be THE ultimate knitting/sewing/drawing bag for myself. I used some black twill, some gorgeous cotton printed with Chinese horses, and a few metal findings I'd been hoarding for some time. While I still love the bag, it never really gelled as THE bag for me. I know this because I took the strap off to use on something else a couple of months ago, and never put it back. The bag has since been sitting unused in my bedroom, which means it's time to attempt an upgrade.
This entry is mostly for my use & my notes, but I know many of you sew, and some of you who don't sew have wondered what goes into planning a project. You'll notice that I am not using a premade pattern. While I have a huge collection of them and could probably find an easier one to get my desired result, I wanted to do this entire thing from scratch. This may make me a sucker for punishment, but this also allows me to sell my work later, or even sell my design. Everything here came about through my observation of how the hardware works, what I want and need from my bag, and my particular aesthetics. This design is also not for reproduction (though I highly encourage you to use the process) or sale except by me, because man, I did a lot of math for this. :)
The Process
Before I did anything else, I made a list of the things that I did & didn't like about Bag v.1. I came up with the following:
Good:
- LOTS OF POCKETS
- washable
- sturdy
- large enough for multiple projects
- easy to transport
- got to use fabric from stash
- able to use for spinning, sewing, knitting, crochet, and even artwork
- specialized pockets: needles, pens, folders/patterns, phone/wallet/etc, medical & emergency
- very roomy
- color scheme was very striking: black outer fabric, brown/blue/red/black fabric inside, red zippers
Bad:
- no structure, falls down
- flap gets in the way
- strap never properly made
- strap pulled bag out of shape every time
- hard to get into bag when carrying it
- too many pockets--collected junk & weighed bag down
- black fabric shows dust, kitty fur, sand, lint, fuzz from yarn, etc.
- black fabric is boring
- clips for strap kept getting twisted or caught
- didn't usually bother to close zippers, making them unnecessary
- hard to transfer projects out of bag; had to dig in pockets to find things
This list was mostly in my head; I started to think about the things I would do if I made a new version for myself. From the above items, I was able to get a better idea of what I wanted from my next bag:
- Plenty of pockets, but now most with assigned uses (to cut down on clutter)
- No zippers (not really needed)
- No flap over main opening
- Matching removable small notions bag
- Matching drop spindle bag
- Mylar sheets in sides & bottom for structure & shape
- Fabric interlining for extra body, nice sleek feel
- Defined, clean-lined, vertical design
- Stay open when I want it to
- Want to use "Rowan" fabric from England for lining
- Must be washable, or at least dry-cleanable
- Must be able to carry multiple projects, like old bag
- Convertible from hand-carry to shoulder-carry
- Most importantly, must look like "me"
Materials
After all that thinking, I finally started to write & draw things on paper--partly to get them out of my head. I like to sketch out designs on large paper using woodless colored pencils. They're like China markers, except there's no wood or paper to seal them; think of conte crayon with a plastic casing to protect your hands. I like them because I can use different colors to edit my drawings, keep layers straight, and define sections without redrawing the whole thing each time. I use a large 18x24 spiral-bound drawing pad for paper; it allows me to flip to different pages without earlier ones falling out, and later I can go back to refer to the drawings if I need to.
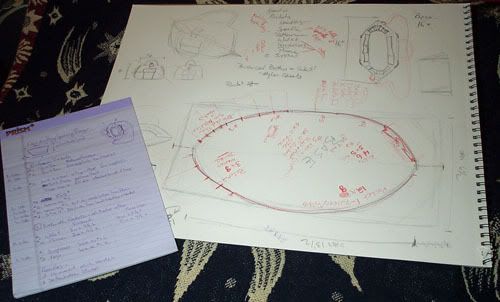
Pic: the sketchy notes
I have a multi-step process for creating the actual pattern pieces. This helps me figure out the basic shapes needed to make my sketch into a 3-D object, how they will be placed on the fabric I have to work with, and allows me to fix my math BEFORE I ever put scissors to cloth. Once I have the design sketched out, I will grab some graph paper, note that each square=1", and draw out some boxes. I don't worry too much about the pieces' overall shape yet, since I just want to see the area required and to see how the pieces relate to each other. I don't worry about seam allowances either, yet.
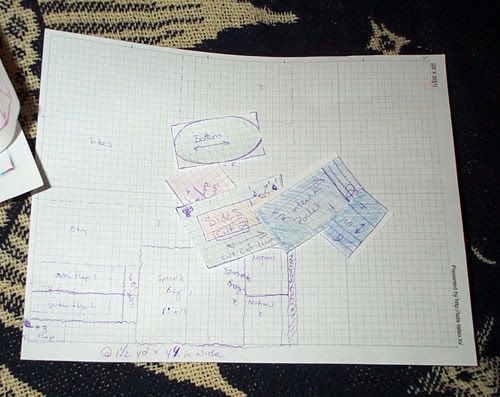
Pic: graph paper & little pieces
Once the pieces are graphed out, I color them different colors (orange for interior pockets, green for sides, etc) and cut them out. A second piece of graph paper becomes my fabric. It's like setting out a pattern for a Barbie doll at this point. I arrange them in the tightest formation possible (adding a rough estimate for seam allowances) and then it's time to move on to full-size graphing.
Pic: Large pieces, cut out with notes
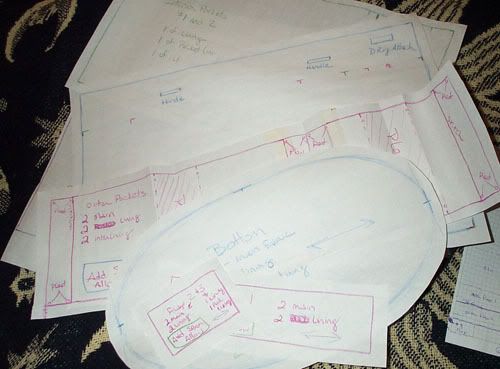
At this point, there are two ways I can go. I will either grab a Sharpie, my cardboard cutting board and a bolt of nonwoven interfacing, or I'll use my colored pencils with a giant easel pad pre-graphed with 1" squares. Since I am doing a bag and the pieces aren't too big, I chose to use the easel pad this time. Using the small pieces as a guide, I drew out the first piece: the side of the bag. I had planned for the bottom to be 13" long, and the top edge to be 16" long, giving me the shape I wanted. Out of curiosity, I noted where all the pockets would go on both sides, the handles, the d-rings...and something felt wrong.
This is why I draw things out many times. I had forgotten that my 13" base was an oval, NOT a straight seam. When thinking about the shape of the bag, I had pictured a soft, flat-bottomed V. The piece was shaped like an upside-down trapezoid, which worked with my mental image. However, the pieces wouldn't have added up when I sewed them together if I had left them that way. In order to go around the edge of the oval, I would need to have a 16" bottom edge! Therefore, if I wanted the final bag shape to be that flat-bottomed V, I would need the side piece to be a rectangle, NOT a trapezoid. The trapezoid would occur when the pieces were attached and viewed in 3-D.
The above doesn't make sense to you? No worries. Just so long as you understand that my math was off for that one line--which meant I went back over the rest of the entire pattern just to make sure nothing ELSE was out of sync. I re-drew that piece, then the rest, and cut them out after making notes on each one about how many I needed to cut out of each fabric.
Pic: Pattern piece comparison. The tiny piece is the original graph paper version.
The Actual Design
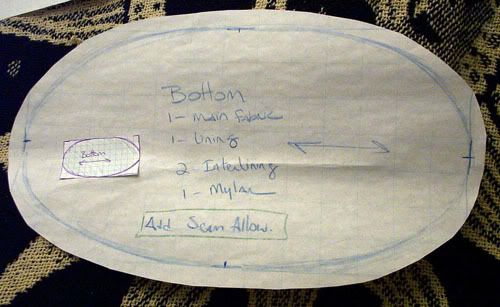
This bag evolved around the piece of hardware I'll be using as a closure. It's a 16" "snap purse frame", which opens up into a six-sided lozenge shape. I have been wanting this kind for some time because it stays open on its own. It's the type used for carpet bags and such. When closed, it's 16" but when open, it's 13" long and 7" wide. I envisioned a trapezoidal bag that would become a rough cylinder when open. The bottom is a long oval, and there are only two pattern pieces for the upright sides (meaning there aren't gussets or shaped sides, like my old bag had).
There would be two pockets on each broad side, with unsecured flaps and box pleats; one would be 8" and the other 3", for wallet, phone, keys, sunglasses, etc. These would be lined with the same fabric as the interior of the bag.
Inside, I plotted out seven pockets. On the right side, pocket 1 would hold patterns even if they were in pocket folders, and then the remaning section (pocket 2) would be divided at every inch for tall knitting needles. On the left, pocket 3 would be pleated with a flap, to hold extra 'supplies' and a pillbox for emergencies. Pockets 4, 5, and 6 would be the same size but without pleats or flaps. Pocket 7 would be shorter; this and #6 would also be divided at each inch for holding pens, crochet hooks, and small knitting needles.
Even with all these pockets, I think the bottom will remain uncluttered. Between the structure of the Mylar and the overall shape of the bag, I think this time the center will stay roomy and open--no matter how full the pockets end up! I have only two small sections that haven't been 'assigned' a use, so I can use them for holding my business cards or a small notebook. They're small enough that even if I try to throw yarn labels, receipts, or test projects in there, I can't take too much.
Notions & Accessories
To carry the bag, I will be looking for a pair of arch handles that are 6" between the ends. I may make them myself if I can't find some I like, but I plan to do a lot of looking around. I might go with leather ones depending on the outer fabric. There will also be a 'D' ring attached securely at the right corner on both sides of the bag so I can add a shoulder strap. I wanted to keep this as simple as possible: one strap, attached at either end on opposite sides. It should maintain the balance of the bag without affecting the hardware.
The hardware will be hand-sewn into a casing made from the main body fabric. It will be added after the mylar inserts go into the sides, probably after the handles are added. I will reinforce the seam with grosgrain ribbon, also hand-sewn in.
While I work on this bag, I will be making some accessories as well. I have always wanted a spindle bag for my drop spindle; I have seen them at my local Guild meetings and it seems like a much nicer alternative to the plastic bags I've been using up til now. I have enough of the lining fabric left over to make a few, so I might just do just that. I will also be making a removable notions bag out of the same combination of fabrics, styled somewhat after my current one, which is a zippered makeup bag. I might monogram them both, just because I want to do some embroidery.
Fabrics
As I mentioned above, I know for a fact that I want to use my "Rowan" fabric for the lining. It's a lightweight calico cotton printed with blue and lavender knitting swatches, needles, and balls of yarn. I bought it on Ebay from a woman in the UK, which is the only place it seems anyone can find this line. I have about a yard, and it's 60" wide--PLENTY for the project and then some. I knew when I got it that I wanted it for a knitting bag someday.
Unfortunately, I don't have a specific outer fabric in mind. I think I'd like it to be one of the colors of the fabric, or at least a complementary color. Naturally, I'm thinking greens right now, which honestly wouldn't be bad. If I can find a nice bright--but not too acidic--green or green & yellow fabric, I think this would be a really pretty bag that would look nice at least two seasons of the year. One idea I had was to use some velveteen I have in my stash. I have a sagey green and a nice buckskin tan; I can envision the tan as being a nice neutral counterpoint to the busy calico. It would also give some additonal structure overall, which again, this bag seriously needs. I might use the green velveteen for my practice bag.
Interlining will be of plain white cotton muslin, pre-shrunk and ironed. I'll baste it to each pattern piece and treat it as one with the fabric. I thought about iron-on interfacing, but I like the look more of an independent layer. I used this technique when making bodices, which were very stuctured, shaped garments, and it was always easy (for me at least) to tell when I used it and when I didn't.
Back to the Present...and Future
Now I'm armed with the design, some ideas for fabrics, and most of the hardware & notions I'll need. I will add updates as I work--at this point, there may not be many if I can get to the fabrics I'm thinking of using & I can clear out my sewing area again. I WILL be making a practice bag, as noted above, which will let me tweak the design further and experiment with the fabrics, textures, etc. before cutting into my hard-to-get "Rowan". If this works, I might consider adding them to my Etsy shop or giving them as gifts.
I'll also note if I change things; the handles might end up being switched with a different style, or pocket sizes may adjust...whatever.
Comments? Suggestions? Questions? Been there, done that, don't do X? PLEASE let me know. :)

2 comments:
Would you consider selling your pattern? I'm a sewer and always on the look for good sewing patterns.
I would certainly consider it. Once I've made the first one, I can let you know & I'll probably put the pattern up on my shop as well. :) By then I'll have a better handle on fabric requirements, etc., too.
:D Thanks for asking about it! :D
Post a Comment